So work is progressing on the board, mostly painting. After sealing the board with several layers of watered down pva I sprayed the entire board with 2 layers of a red primer spray. I chose red only because it was cheap from "The Range" and close enough to the brownish look I was going for. This is what it looked like, I must admit it looks like a Mars landscape and I was tempted to leave it and just have it for a John Carter scifi type game!

However I persevered and used another cheap spray from "The Range" this time a Rover Russet Brown colour, unfortunately I didn't realise the glossyness of the spray (I should have of course!). Having sprayed this layer down I needed to tone it down a bit, but it would have cost me a fortune in black washes such as GWs "Nuln Oil". This is where the power of the internet comes into it's own...well i'm sure there are other uses but..... with a little web-fu i managed to find this guy Luke's Affordable Painting Service. On his FB page he has a link to a YouTube tutorial which you can find here among loads of other really cool ideas which will feature, including the water effect I'll use later on with the board. I can't praise this guy enough, the wash that I made for this board cost me less than £1, compared to the hideous amount of money that the several pots of "Nuln Oil" would have cost, don't get me wrong I will more than likely keep using 'proper' paint for my minis (at least until I'm totally comfortable with it) but for my terrain pieces this tutorial is spot on!!

now it's still very shiny here, the wash toned it down a bit, but the gloss is shining through but I wasn't worried as it was my intention to put on multiple layers of paint over the top as I highlighted up. Using GW's "Mournfang Brown" as a base i added an increasingly larger amount of Dulux "Cookie Dough" (the colour I use for my Temple terrain) to apply 3 or 4 layers of highlight to get it to....

The next task was to glue the pilings for the jetties to the base and paint in the river/sea beds and for this task i went back to Google as I've never been happy with the way my water effects have come out. Stumbling finally across an amazing model railroad blog that broke it down brilliantly, you can read it here. Using the guidance I found there, I came up with a colour chart for me to use when preparing the paints so that I could easily reproduce it and then applied it to the appropriate areas.


and then I added the wooden floors for the market places and finally we have.

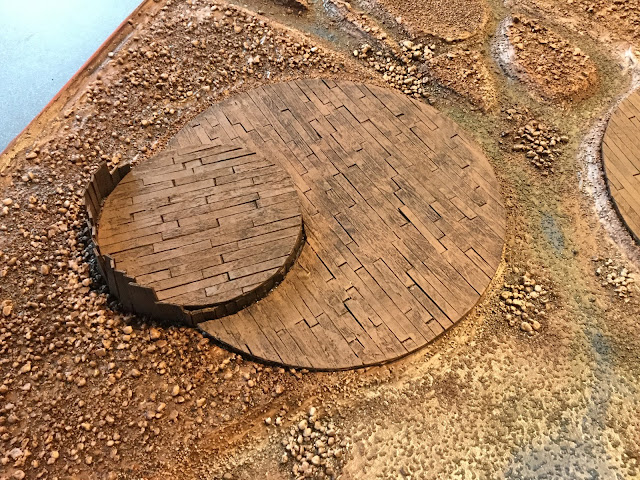

which is where I'm going to leave it for this post. Next time the finished article!
hope you enjoy
dGG

now it's still very shiny here, the wash toned it down a bit, but the gloss is shining through but I wasn't worried as it was my intention to put on multiple layers of paint over the top as I highlighted up. Using GW's "Mournfang Brown" as a base i added an increasingly larger amount of Dulux "Cookie Dough" (the colour I use for my Temple terrain) to apply 3 or 4 layers of highlight to get it to....

The next task was to glue the pilings for the jetties to the base and paint in the river/sea beds and for this task i went back to Google as I've never been happy with the way my water effects have come out. Stumbling finally across an amazing model railroad blog that broke it down brilliantly, you can read it here. Using the guidance I found there, I came up with a colour chart for me to use when preparing the paints so that I could easily reproduce it and then applied it to the appropriate areas.


and then I added the wooden floors for the market places and finally we have.


which is where I'm going to leave it for this post. Next time the finished article!
hope you enjoy
dGG
Oh my goodness me, I love it! What a sensational build Sir,
ReplyDeleteThank you sir, I must admit it has gone well
DeleteWhat Michael said. Never seen better.
ReplyDeleteWow, thanks Martin
DeleteExcellent work!
ReplyDeleteThanks Fran
DeleteFrom the plains of Mars to the shores of Japan. Great work, Andy, and what a difference a lick of paint makes.
ReplyDeleteNever a truer word spoken Bryan, a lick of paint and it starts to really pull together
DeleteCreative and amazing job, congrats!
ReplyDeleteThanks Phil, it certainly has stretched my creative abilities such as they are :-)
DeleteWhat a great looking board, all the steps you've went through to get there have been well worth the effort.
ReplyDeleteThanks Zab, just a couple more steps to go buddy
DeleteNow can you just make another one for John Carter`s Barsoom please.
ReplyDelete*chuckles*
Nice work bud.
Oh I was just so tempted Steve, I really had to power through that stage and get another quick couple of paint layers on to get it behind me
Delete**he says eyeing up the blank canvas propped up against the wall wistfully**
*chuckles merrily*
ReplyDeleteI hear you bud ^^
Even worse Mrs Gobbo is putting together some flat pack furniture and there is loads of lovely polystyrene packaging......hmmmm
DeleteNow isn't that a coincidence, Mrs G has just done the same thing for the daughter, so there's loooooads of yummy poly` I`ve nabbed for similar purposes (I`m thinking Great War trenches, off the top of my head).
DeleteIncidentally Andy, missis G (Hil) and I have been trying to get you privately but can`t find an addy anywhere. Can you write a quick note to us so I can reply off it... write to:
gypsy__dance@hotmail.com <-- that's double underscore between gypsy and dance.
No probs Steve, email is on its way
DeleteWow that is coming along fabulously mate.
ReplyDeleteThanks Brummie it certainly has come along. :-)
DeleteMore inspirational and excellent work, Andy. And it's still got the water and other bis to go?! I think this tops the last board - if they're getting better each time, what's the next one going to look like? The mind boggles...
ReplyDeleteThanks Jez, yep still got the best bits (imho) to go! Really pleased with the water effect. The whole board is complete and the post is ready to go but I'm trying to stick to a strict posting schedule and so I'm having to sit on my hands a little so as not to press the publish button too early.......
DeleteWhat next indeed, there are 2 more blank canvases beckoning at me! I have a few ideas such as two junks lashed together in a boarding action, or a Shogunite courtyard or castle, a tea house and/or inn, Bakemono cave. Choices choices