Showing posts with label board. Show all posts

Friday, 6 January 2017

Prefecture of Ryu - WiP part 2

hi all

More progress on my new Bushido board, the inside of the Daimyo's palace.  As you may know, I've had a little bit of a mind block when it comes to the interior, although Jez from Carrion Crow has suggested that I watch "The Wolverine" for inspiration, not a bad shout as it happens.

I was going to repeat the deployment zone that I did in the last post (which you can see here) for the other side of the board but decided to change it up so it wasn't so symmetrical.  With this in mind I went for a raised platform that will allow my Daimyo to hold audience.  So I took some ceiling tile and foamboard and  came up with


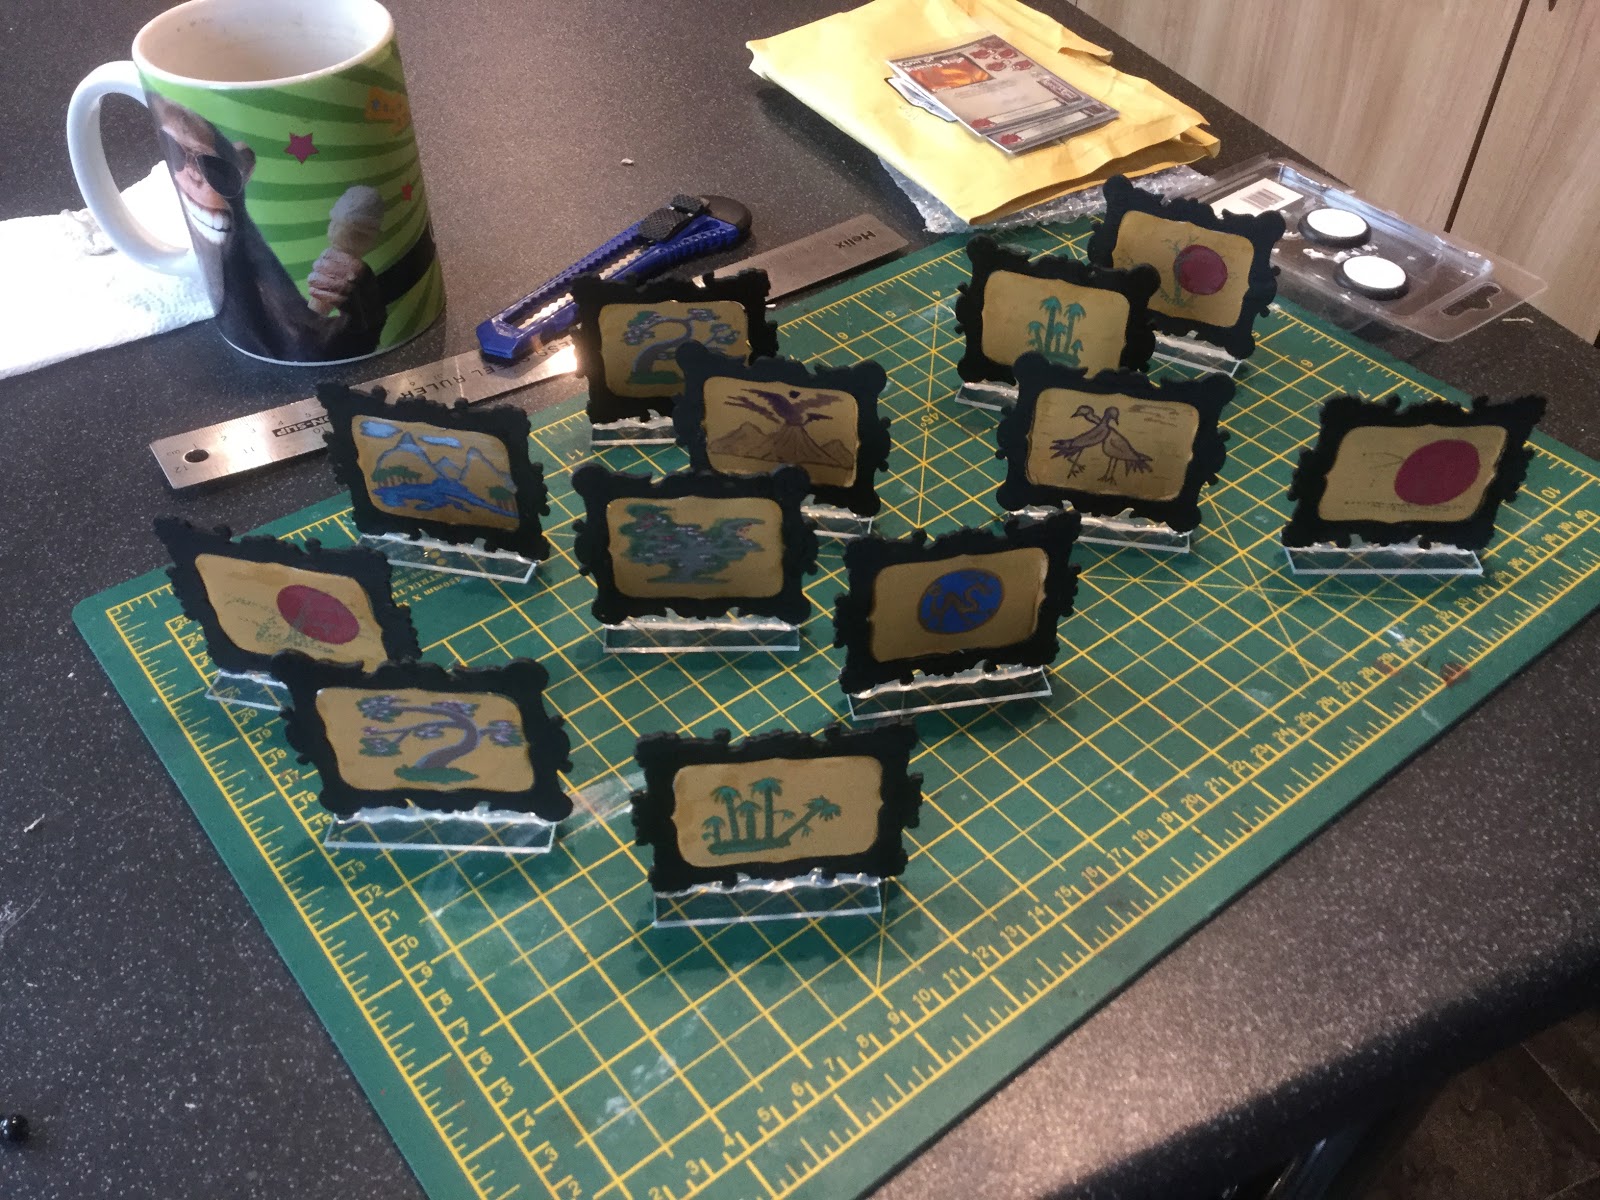
covered with filler and lined with coffee stirrers to make a dais.  Form detail I decided to make a couple of tatami, the mats that fulfill so many functions within the spartan interiors of Japanese buildings.  Firstly I took some foam and a bit of kitchen towel.


I then used very watery paint of differing tones and dripped them onto the towel, not waiting for one tone to dry in order to blend them.  I then PVA'd the towel to the foam.


and finished them off with a couple of oriental(ish) designs in gold and voila.


I then stuck some of the floor tile on the base and painted up the walls (not in that  order!) I painted the dais up as stone just to add some colour to the board.


I needed some more detail so I took a tongue depressor and cut it down to size and used some wooden dowels as legs for a small table to sit at the side of the tatami.


to colour it I just dipped it in sepia ink and then agrax and then added a milliput sake cup and rice bowl that i made a little while ago.  I then added some Kanji as background.


and voila.....


I needed more scatter terrain and luckily for me, Mrs Gobbo bought me some 3D printed pieces from "Master Crafted Miniatures" for xmas.  They were lovely and cheap and look amazing.


They certainly look the part on the board.  I will be adding to the board as and when I can, particularly some zones of control which I will make with a special tool my son got me for xmas but for now this is totally playable and I'll call it done.

**edit** Damon and I played on the board yesterday and the above 4 pics are from the game, note the massive Oni that Damon bought to the party!

hope you enjoy
dGG

Monday, 12 December 2016

new boards - a new project

hi all

As the title of the post suggests i'm going to start a new terrain project.  What I have in mind is two new Bushido boards, yes two!! Lofty ambitions indeed :-)

The majority of the work will obviously be done in the new year, not only because of the lack of available time between now and then but also because of lot of the tools and bits and pieces will be arriving in the guise of xmas presents. However I have been able to do some work toward the first board which will be complimenting (I hope) my Prefecture of Ryu faction.  

My thoughts toward this board is that it will represent a Daimyo's palace, I love the idea of a great Lord's residence being attacked by invaders - which is why i'm looking forward to playing "Rise of the Kage" the board game by GCT which represents a ninja faction invading a great Prefecture Lord's castle.  With that in mind I started looking for materials to build the board and I was fortunate that a terrain idea from a blogging buddy - Jez from "Carrion Crow Buffet" blog about cheap flooring tiles from Poundworld took me along to the aforementioned store where I bought some supplies....


what I found when I got there was these awesome wooden floor like tiles, 4 for a £1 each tile being 12" x 12" which conveniently makes up a 2 x 2 foot board - the perfect size for Bushido!  Now I wouldn't want them on my living room floor as they are a bit thin and my dogs would tear them up in a minute but they definitely look the part (I hope) for my board.  After such an arduous shopping session I had to relax with a cup of tea at the local cafe where I discovered giant Custard Creams exist - heaven!!

massive custard cream!!
anyway, part of my Poundland (or whatever its called) splurge was for these frames which I thought would make really good dividing paper walls within the palace and that would be something I could work on in the mean time while I wait for the big day.


I cut some cereal box card to the shape of the frame middle, i could have sandwiched the card between two frames but wanted to stretch my meagre outlay that little bit further.  In the meantime I sprayed the frames with some black car paint (from a previous visit to Poundplanet or whatever its called...).


the card middles i painted a brownish yellow and painted some "oriental" artwork to them.


once painted I glued them with PVA to the frames, with a little bit of persuasion in some cases


I then cut up some old clear perspex I had from a TV dinner tray that  broke (don't ask...) and used them to base the dividers so that they could go on any terrain board if required.


and there we have it! I may make up some more, after all 6 frames for £1 isn't bad value and I might make those up without the design so that they are spaced out a bit, but for now I consider this a job done.

More to come on this project.
hope you enjoy
dGG

Monday, 11 July 2016

Jung Pirates board completed

Hi all,

I've pretty much finished my pirates board, the last things I needed to do was I guess the scariest in that they had the most potential to go wrong and that was the flocking and the most scary of all the water!

I tackled the water first thinking that if I buggered it up I wouldn't waste all my flock. To that end I had to think how I was going to achieve the right effect. I had already looked up how to paint the estuary bed, which you can see in my last post here, so now needed to cover it some how. I already had a little Woodlands Scenic water from my WW2 canal board, but it was only about half a bottle and that would only provide a thin layer, certainly not enough for a proper effect - still chucked it on though....

But should I go get more at £17 a pop or try to find a credible cheaper option? Rolling up my sleeves I mustered up my best web-fu (which isn't that impressive), however I did hit the jackpot with Luke's Affordable Painting Service - remember him from my last board posting? He not only helped me save money on my ink washes for the board by showing me how to make my own for less than a pound (half a jam jar of black wash and I only used about 20p worth of rinse aid and four drops of black paint...) but he showcased a cheap two part epoxy resin that is great for water effects.  this is the link to his FB page here and his Youtube for this effect here


Each pack comes from Poundland and yes it costs just £1 however I needed 13 packs to cover my board, still it's £4 cheaper and to be fair the stuff dries in 10 minutes and completely hardens in 16 hours regardless of how thick the pour, meaning my drying time is significantly reduced by several days (each scenics layer takes over 24 hours to dry and I would need about 4!) the only down side is you have to work fast if like me you mix lots of it at the same time. I recommend using one pack at a time if you want to get a smooth pour, however you could end up with little steps or gaps all over where the seams between pours are.  For me I didn't want smooth as my water was tidal, this epoxy was just perfect for creating waves and eddies. The only criticism of the epoxy is that it is still a bit tacky even a few days later so i might have to sort this later with a thin layer of PVA.

a good look at the way the epoxy is waved


the water beds

After the resin/epoxy pour it was time to build the bridge that joins the two markets and add the wooden jetties that I had prepared earlier, bringing us to this...


That just left the flocking, for the that I needed quite a bit and I was worried that I didn't have enough of my Army Painter Steppes Static Grass, which I usually use. I also wanted to lighten a rather brown board up so I mixed the static grass with a dark green flock from Woodland Scenics which I've had for ages but never used as it's too bright on its own. And I ended up with this.....


and after I've added all the details i've been working on.

coiled rope objectives (made out of wool)

Lady Oka and bodyguard sample the delights at Cupid Burgers

the flea market

a water kami playing in the harbour

water Yokai cavort in the estuary


Kintaru fishes off the banks


arial view
Richard Fairbrass's original board which inspired the layout and was given da Gobbo twist!
My thanks go to Richard Fairbrass, whose layout on his own board helped me incorporate the scenario objectives into my own.  Thanks to Luke's Affordable Paint Service for saving me a boatload (groan) of dosh, I wish i'd found your page before I inked my Temple board, which would have saved me a ton of cash! And big thanks to Joe from Zabadak's ZombieWorld for the inspiration in the first place, as soon as I saw those awesome pirate ships of his I wanted to do a board, i just lacked the ambition to make a big ship for the board (which was the original idea), sorry Joe but baby steps - next time though....

I shall just leave you with a quick video showing the board in more detail. This time I've narrated a little bit to accompany the video, I can only apologise for the sound of my voice which is a little rough - no I'm not ill, I really do sound this bad normally! Be thankful the original video was 4 minutes but Blogger could not update such a big amount of data and it took days to upload and then didn't work! so this is the abridged version.


Hope you enjoy
dGG


Wednesday, 22 June 2016

New Bushido board - WIP

Hi all

I've decided my new faction for Bushido.  Considering the starter set is due to be released in August and the minis look amazing - It has to be Jung Pirates.  Now the rest of the faction no doubt will take a while to drip, drip out but I don't mind as I haven't got any gaming tokens for a few months until wedding anniversary and Christmas have aided the cause. So this isn't a post about the pirates themselves but about what they fight across....but here's a quick pic from the GCT website of the faction anyway.....hehehe.

I know - right!!

Now it wasn't just the awesomeness of the models that attracted me to the faction as lets face it GCT minis are ALL brilliant in their own way, but rather I was swayed by an unlikely source - the grumpy old boy himself - Joe of Zabadak's Zombie World fame.  His posts about his pirate project including his lovely ships which you can read here have really inspired me to build a special board for Bushido which might have passed for Silvermoon Trade Syndicate (a collection of street criminals and underworld merchants) which I really am interested in getting at some point, but instead what I had in mind just suits the Jung to a tee. Actually i would really like to see both factions battle across the board (in fact it has several times in my head....)

Anyway to the board, i wanted to build a themed board based around a harbour scene that not only looked the part but was fully functional i.e i could play most of the scenarios listed across it, a bit of a tall order considering how many there are. However recently I saw a board made by a chap called Richard Fairbrass, posting on a Bushido face book page I follow and it blew me away with how good it looked.


board by Richard Fairbrass - just excellent, I would love to game across this!!
You can see the idol objectives around the middle of the board and the various circular control zones and even the corner deployment zones that Richard has made into terrain features on the board, brilliant and totally inspiring.

Seeing the possibilities in it, I reached for artists canvas....no  i'm not an artist lol but i do use them as they are 2'x2' squares and perfect for Bushido boards. The harbour would need to contain ships or boats (hence the Zabadak's inspiration part of this project) and these would also need to be playable across. This is what I've come up with.


So firstly i covered the canvas with a large piece of corrugated cardboard that i "borrowed" from Tesco, I think it was a tray for baked beans cut to 2' square and glued to the canvas for strength.  I then layed out all of the objective points onto the card, initially I got a bit confused with where they went but after finally labelling the top and the bottom of the board (seriously!?!) I managed to work it out....

then I had to decide how the board features I wanted would interact with these points.  So the board would be at the mouth of a river and would feature wooden piers for the boats to tie up alongside.  Initially I also wanted some kind of inn or seedy buildings in and around the harbour but what I settled for was twin markets that covered both sides of the river and joined by a wide bridge, the first market would be the usual food and goods type thing and the other would be a flesh market for the pirates to sell slaves for the pits and brothels.  to this end I added some of my polystyrene ceiling tiles that I had from my Temple board and cut them up like so and gluing them to the board. This would provide the relief on the board and represent the river/estuary. I added a 4" circle to the land portions to represent a raised platform for the overseers and moneylenders to look over their respective markets, which would be represented by the 8" circles (these are objectives in the game) I also added a little wooden fencing to break up line of sight.

the cups are being used as weights to aid the gluing process.
I also added cardboard edging to the board to make it look neater and to aid the resin pour for the water later on.  The whole board was then covered with filler that I got from a pound shop.


I then added some sand to the river bottom and the control zones and cat litter to the other areas to provide some general texture.  The board then received three coats of watered down PVA to seal the whole board and to provide some protection


The next step will be to use a red primer spray to cover the piece and then a brown spray and other colours for the various parts after that I can get started on the detail.  To that end I've already started building the boats which i will show you in another post.

hope you enjoy
dGG