Wednesday 31 August 2016

A mighty river - completed

Hi all

As the title suggests, I have finished my river sections from my previous post which you can find here.

Following the base coats of emulsion I gave all of the sections a heavy wash, which I made myself using Luke's video for home made washes which you can find Here

So to progress this terrain, it needs to have the river beds painted, now this is where I have fallen foul before by not getting the colouring right and ending up with very blue rivers, which is fine but hasn't been very satisfying in its lack of realism.  So I went back to my Pirates board and looked at the waterways I used here.  I referred back to my colour chart


I ended up painting these, I also made sure that each layer matched at the ends of each section so that the pieces are totally useable in any configuration without looking odd...


So after painting it was time to add any extra features that I wanted for the river.  I'd already made a couple of ford sections and put the rocks/pebbles onto the sections before painting so  I just needed to add foliage, grass, and any debris in the water.  To this end I used all of my foliage options in da Grotto.  Static grass from Army Painter, clump foliage from Scenics, weeds from Scenics, tufts from Army Painter and Tajima all came out and got added.  I used my leaf cutter on real leaves, I used twigs from the garden all to produce these.....


Finally I sealed the lot with watered down PVA and then Matt sealer spray.  Then it was time for the water effect.  This causes me to get nervous, this is the irrovacable step, if it gets messed up then a large investment in time and money goes down the tubes.  I used 2 part epoxy, the same as I used on my pirates board above. 2x tubes per straight and bend section and 1x tube per sharp corner, costing me a pretty penny, but this is the result...


I love them, the epoxy allows me to sculpt the water to create movement and flow, you do have to move quickly but it totally eliminates hours (days) of drying time with other mediums.

let me know what you think.

on a side note, my previous river sections - which were decent but fell a little short of what I wanted have gone to a good home and are still going to get game time.

hope you enjoy
dGG

Monday 29 August 2016

Ashigaru

Hi all

Before I start this post in ernest, can I just thank the amazing Tarot for her gift of the Celtos rulebook that i received from her in the post last week and to my shame failed to mention her generosity here.  Thanks mate, as generous as you are talented and beautiful.....is that enough? No! More you say? oh ok...no no it's fine.....look i said i would say it.... and clever and interesting....look now it's just coming across as creepy...no I'm just gonna stop....no no, look just who's blog is this anyway!! and funny and generous....happy? What do ya mean I already said generous? you sure? No one will have noticed, I'm sure they won't have, good that's settled then..... Anyhoo where was I...oh yeah a pic for those of you who don't know what Celtos is, I'm looking forward to exploring the book in more detail and then adapting some of my collection accordingly.  From what I've seen so far it looks ace.


Following my previous post featuring Hiro and Hanso I give you the last 3 members of the Prefecture of  Ryu starter set - the Ashigaru. These guys are the rank and file of the Takashi household and reflect the military nature of the Prefecture.  First up we have Minuro, he's an arquebusier, now I've already shown one arquebusier (here) but Minuro is a named character and therefore you are able to field both in a warband. Minuro has the added Ki feat "3 rounds a minute" which allows rapid reloading of his deadly firearm in comparison to his slower compatriots.


Next up is Jin, she is a Yariman with a difference - she's a girl! She is also an improvement on the bog standard Yariman with additional traits and an extra Ki feat, obviously this comes with a additional rice cost. 


Lastly we have that bog standard Yariman, he is not named and can have a partner as a result of that (dual wound tracks means you can replicate a model and have two!) these guys are useful as there first strike and 0 cost push attack are great at clearing objectives at scoring VPs, very useful in Bushido which is all about objectives.


Last but not least is a group shot of the force making their way down the mean streets of Ryu.


and with Hiro and Hanso as the complete set


This is a great set and would set you up nicely for the smaller sized 35 or 36 rice games, by adding another model such as Matsu you can upgrade to the medium sized warbands of 42 rice.  At around £25 each (depending on where you shop) the models come out at about a fiver each, which while that seems expensive (to me anyway) it's actually quite competitive for 32mm metal miniatures (the normal Bushido models are £6.95 and up), additionally there are very few game systems where you can buy a complete faction for less than £30 with the relevant cards and with a FREE to download rulebook plus other downloads.

Thats it for now.
Hope you enjoy
dGG

Friday 26 August 2016

bonus post - a massive congrats

hi all

this additional post serves two purposes.  

Firstly congratulations to Lee Hadley of "Big Lee's Miniature Adventures" a blog I have enjoyed over the last few years since starting my own blog and have followed on Google Plus for a little while (i appear to have dropped off his list recently which is weird...).  he has reached a staggering 2 million, that's 2 MILLION page views on his blog!  He has over a thousand people following his blog, now compare those figures to my humble offering.

Big Lee                                      Da Gobbo                    

2,000,000 +                              32,000 +    page views

1034                                          33             followers

Staggering as I say, the blog is well worth the read, i'm sure most of you know that already though.  As is almost customary Big Lee is celebrating this milestone with a giveaway.  This is a free entry to followers of his blog to a random draw for some awesome prizes.  If his blog is pimped out on another (ie here) you get another 5 entries.  So this is his pimping! not that I shouldn't be shouting off the rooftops about his blog anyway as it really is very, very good.

That was the first reason, the second is to put a little fire in my belly and try to emulate the success of Big Lee. Now I didn't start this blog so I can gain a following or get page views or so I can become a blogging legend.  I haven't added the advert option on Blogger which puts adverts on the pages in order to generate revenue (although maybe it might happen at some point).  This blog was put up to motivate me to improve my wargaming, painting, modelling.  It was put up to provide a platform to discuss the games in general and to provide some entertainment in the form of batreps.  But if I can build on the blog than I can reach more people and generate that discussion and strive even harder to be better, to do more then all to the good...

Phew, that was a bit much wasn't it? Anyway congrats Lee, you deserve it.  to celebrate I'm going to have a little wander through your archived posts at some of my favourites...


Hiro Takashi and Hanso

hi all

Among my recent anniversary gifts, nestled in the lovely wooden box was the Prefecture of Ryu starter set for Bushido.  Now like my Temple of Ro-Kan starter set, I received this at the end of my collection of minis for these particular factions which seems a bit of a strange way of doing things!  The starter sets, in my opinion are very well balanced and really should come first as they are all very usable straight away and don't need to be added to immediately and they will be the first thing i purchase when i collect other factions (yes that is happening so brace yourselves for more gushing posts...).

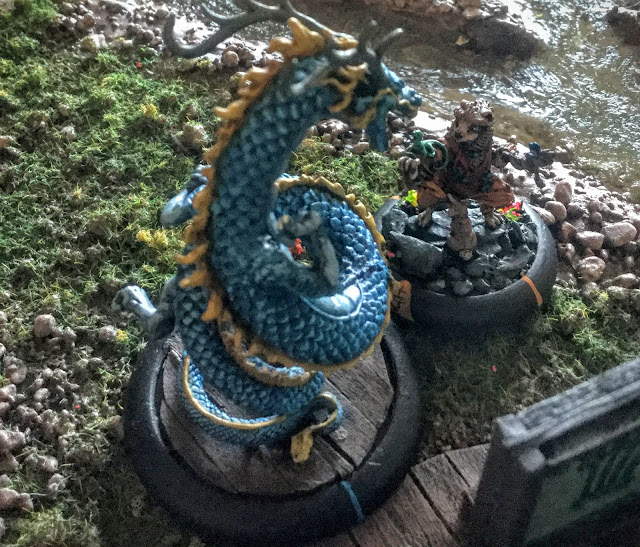
The Ryu starter then is led by two very capable characters in the form of Hiro and Hanso.  Hiro Takashi is a member of the ruling house of the Dragon Clan and trained in the arts of the samurai.  With his heirloom katana and bespoke heavy armour complete with snarling demon-faced helm he is well equipped to take on the enemies of the Prefecture.


so by now I was using the very familiar palate that I have devised for the Prefecture faction, with blues being the dominant feature and these run through the whole starter set.  To add a bit of contrast I made his helm have a bright red visor and used the same red for his hauberk and bracers.  The model comes with alternate heads and katanas - bare headed and normal katana, but i wanted him to stand out so the katana was the flaming kind.

Hanso was a gunso (sergeant) in the Ito Clan army when he was "poached" by Hiro, found out how here. He is described as a bear of a man and the model is a bit bigger than the others although not stupidly so.


He follows the Prefecture colour scheme of course, his special feats are based around his enormous strength and his sergeant role in the army as he can order the basic ashigaru to "Move it!" and they activate for free - very useful.


thats it for now, next post is the last of the starter set - the ashigaru.
hope you enjoy
dGG


Wednesday 24 August 2016

a mighty river, well a WIP anyway...

Hi all

a quick WIP of a project that I'm working on but will probably go on for a while as its a bit of a slog to get it all finished.  As regular followers of this blog will know I love building terrain but I've always struggled on one of those iconic terrain pieces that features on nearly every games table around the world - the river! now when I say I struggle, I really mean it! every attempt i've ever made to put a good looking piece of waterway on the table has been a failure and I end up with an unsatisfactory result which i'm just not happy with. Whether it is the banks or the riverbed, water effect or everything there is always a part of me that just doesn't like the end result.

Determined to end this run of disappointment and to get a decent river feature with lots of options on layout I decided to check out t'internet and see what other folks were up to and what I can conceivably pinch... Anyway I pitched up on this guy's website and he was using river sections made by Amera Plastics, now I wasn't looking to purchase pre-fab stuff but i kept on glancing over at my various efforts (one with miliput banks - expensive and looked naff! the other with banks made up of piled up kitty litter - just no) and I thought to myself why not. With that I went over to their website, I've bought plastic craters from them before and the cobble stone streets I used on my modular BA boards so I'm used to the product and have already enjoyed their prompt service and this time was no different with 6 straight sections, 4 bends and 2 tight corner pieces turning up in no time at all.


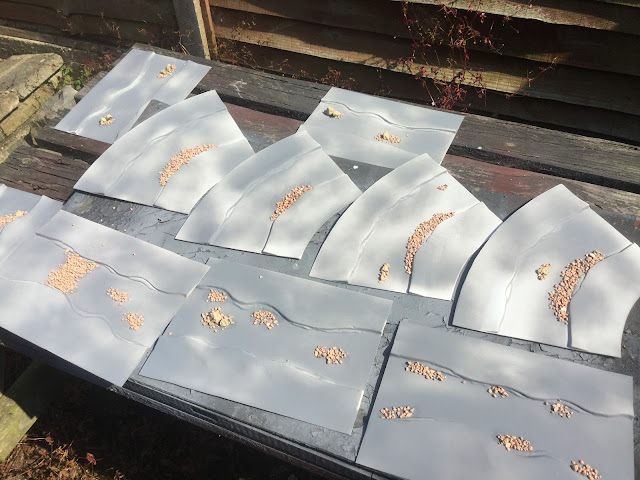
The pieces are made from injection moulding and are a plain white, shiny plastic with quite an excess of spare trim on the banks.  I decided to leave the trim as it was for the time being until I could make up my mind whether I wanted to use the excess to form part of the scenic features (in the end I decided they were too wide and trimmed them back).  Next up I gave them a cursory spray with a cheap grey primer just to give the following paint layers a bit of a chance of sticking.


Next up was adding a little bit of detail,now this is where I always fall down with inaccurate and poor detail, so I hit the web again for some proper knowledge!  I found a great GCSE level geography revision site that described flow patterns and how debris is deposited and how rivers cut their way into the earth.  Jolly exciting stuff, if that's what floats your boat (ahem) but necessary so that my rock placement wouldn't look out of place.  Turns out that pebbles and rocks are mostly on the inside bends of rivers due to flow speed being slower there allowing them to wash up and settle.  More sturdy and bigger rocks last a little longer and can find themselves in the middle of the flow and of course fords are formed where the water shallows out briefly and would provide my little guys a natural crossing on the tabletop.  My pebbles were made up of kitty litter glued in place with the rocks being made up of broken pieces of cement.


The next task was to put a general layer on the pieces that would form the river bed and the banks, now normally I would reach for the fine sand and just add a layer that would cover both and look....well ok... but I've been there and done that.  Back to the interwebs and I decided to see what advice the terrain guru that is Luke Fellows from Luke's Affordable Paint Service has for me.  Scanning his You Tube channel for inspiration I found this one here, a way to make my own textured paint similar to GW's "Stirland Mud".  Now this stuff is ace and it cost me less than a £1 to completely cover all 6 feet + of my river sections and still have so much left over I'm thinking of making some dirt tracks for Bushido and Ancients at a later date.


and so this is where we are at the moment, I've managed to add another coat of the cheap emulsion sample pot that I bought from Johnson Paint.  But I guess its just a little darker than this but not by much.

anyway that's it for now
hope you enjoy
dGG


Monday 22 August 2016

Miniature transport

Hi all

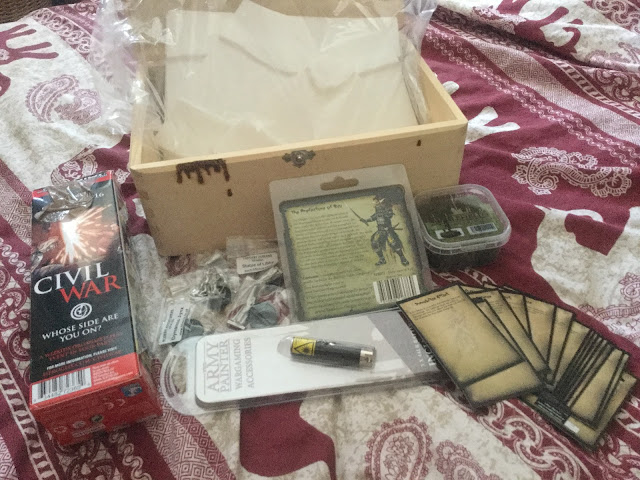
One of the standout gifts I gratefully received  at last week's anniversary celebration last week was this wooden box.


The box was handcrafted by a couple of artisans who were visiting the next town over for a Folk festival - Broadstairs Folk Week. The festival is a massive boon to the Islands local economies and more importantly adds a lot of colour and energy to Thanet in general (the Isle of Thanet being a collection of towns and villages on the South East of England....ah look it up....) I love it, loads of music, loads of ale and loads of "fringe" artisans displaying their cottage industry wares. No mass produced commercial rubbish, just interesting one off pieces produced by true artists, working in wood, leather, metal, ceramic - awesome. 

There were several boxes of similar sizes and smaller, even a couple of chests (they were amazing but hugely expensive) all of them hand decorated with a Hotwire to burn in a design. I casually remarked how clever they were and how great they looked and walked away to the next stall, meanwhile missus Gobbo was thinking about our upcoming milestone with a thoughtful expression on her face.  So while I was drooling over the handmade fudge stall, she was chatting away with the artists and sorting out this


Now I know I showed this picture last week in my Loot post but I have to say what a clever, delightful design it is, personalised to me and so thoughtful that I think it deserves a second showing. Anyway missus Gobbo filled it with lots of hobby shiny and said I could use it to store models or modelling supplies in it but that seemed like a shame to keep it in da Grotto and not show what the box off in all its glory. I wanted to take it out of da Grotto, on the road with the Nerd Herd and getting some use.....Lightbulb moment! I'll use it to transport my miniatures around.

So the following day I went out and bought some supplies from hobbycraft and set about making a troop transporter! now I didn't want to mess with the box itself as its a piece of art, so i needed to be a little respectful and add a removable interior (which also gives me more flexibility) which wouldn't detract from the original work.  With this in mind I took some basswood, which is sturdier than balsa but thinner than plywood and with a lot of cutting and cursing made up some inter-lockable dividers.  most of them were 40mm divisions to accomodate the 30mm bases of my Bushido figs, there are some larger spaces for 40mm+ bases, cards, rulers and suchlike. because there was enough depth to the box I added a clear perspex sheet that can be popped over the dividers to create another layer but still allow me to check that the models are ok.


my new Prefecture of Ryu  take up residence in the new transport while they wait for some paint.
that's it for today.

hope you enjoy
dGG


Friday 19 August 2016

The peasants are revolting!

hi all

The last minis in the Temple of Ro-Kan starter pack are the rice farmers. In the pack you get two, one of which is the standard "rice farmer" shown below on the left. He is very much a support model with his bodyguard trait he can sacrifice himself for the "greater good" or he can buff the "ki" feats of your monks with his "Faith" ki feat, making it easier for your monks to do what they need to do. The farmer on the right can be used as a bog standard version or she can be enhanced at the cost of an extra rice point to a named character - Atsuko, although still counted as a "peasant" model she brings with her a barrel of healing saki (well it might be holy water but...) to distribute to tired monks and fighters restoring their bodies back to health.


Paint wise they have no right to wear the orange of the Temple as they have not even been initiates so it was harder to tie them into my faction beyond painting the base, so i just stuck to drab, homespun colours.  For GCT standards the models themselves are fairly basic, although the chicken on the farmers backpack is amusing, the rest of them are fairly meh! so I just powered through. The bases have had bamboo attached in rows in an effort to look vaguely field like but i wasn't really feeling these guys, which is a shame because they are likely to see action a lot due to "Faith"

Lastly a group shot of the Starter Set - I really should have bought these first as they are a lovely balanced introductory force of about 35 rice (the recommended starting warband cost) GCT have done well with their starter sets and all of the factions except the ninjas have them.  I have got the Prefecture of Ryu starter set coming in a couple of weeks and when I finally get round to collecting the other factions i will go with the starter sets first.


hope you enjoy
dGG

114:73 (-41)


figs bought:painted (difference)

Wednesday 17 August 2016

Anniversary loot

Hi all

Just a quick additional post to show off why me and missus Gobbo have been married for the past 20 years! Yes it's our anniversary and she so gets me.....


Back to the celebrations
Hope you enjoy
dGG
Bushido day!

hi all

Last week I spent a day playing Bushido here in da Grotto. Three glorious games on three boards with three different Warbands, trying them on for size.  Sadly as we were trying to get in as many games as we could I didn't write any notes, so no batreps for you guys - sorry! But I did take some photos and I promise I'll do a batrep soon when I can grab some free time and do a solo walk through. Solo is difficult with Bushido due to the combat system but I'll work something out as it's a great way of working your way through the rules and getting them cemented into the brain in time for going to the Bushido tournament in November.  I also got a massive order from Blotz the chaps I get my tokens from, I know i've done a post on Blotz before but the reason i mention them again is to highlight their amazing customer service.  Their standard set of tokens doesn't cover the full range of Bushido "states" due to new models coming through and new states being added to the rules via errata documents, so when I bought my first set of tokens i was a little short and they did not quite cover what I needed.  I scoured the internet to find some tokens to cover the states such as "immobilised", "held" and "spirit blocked" but couldn't find any, let alone some that would match. Dejected I went back to Blotz and sent them a cheeky email to see what we could do about this.  Within the hour they had contacted me back saying that they would custom make the tokens I needed. Beaming with happiness I duly sent off the order and TWO working days later I get my tokens!! - just superb service and these tokens come highly recommended by me (as if that means anything at all....lol)

anyhoo
Enjoy the pics...


just to finish this post off i'm trying out a new app on my iPad


hope you enjoy
dGG