Friday, 15 July 2016

Blotz

hi all

Just a quick post before the weekend, I recently played a game of Bushido with Damon and it was great (obviously!) but it did highlight the need for more Ki tokens from me as we were a little light.  There were various ways we could have got around this with dice markers etc but I quite like having visible tokens without fiddling around.  Now I know there are a lot of gamers who get turned off by token heavy games and that's fine and you can get away with not doing that in Bushido but I'm not into notepads or trying to use my rather shoddy goldfish like memory to remember if my individual warrior ran or has been poisoned etc, so I quite like tokens and I'm not too worried as long as it doesn't get in the way of the game. 

With this in mind when, on a Bushido FB page,  a fellow gamer mentioned the company "Blotz" as a source for cheap tokens I had a little mooch over to their website. Now I've already made "tired" and "exhausted" tokens as well as some "Ki" tokens out of poker chips I bought at Salute for that purpose, so I didn't need them (except to bolster the Ki ones as stated) but I did want some for the other statuses. Each status pack costs £1 for 5 or £1.50 for 10 and come in whatever colour you want, I went for different colours for each one so it's easier to differentiate between them in the bag. I'm not going to use them all with the factions or minis that I currently have but I have every intention of collecting more and more of the various factions over the coming years so bought the whole collection and it cost just £13... Sweet.

I like these because they are fairly unobtrusive and just sit around the lip of the base so very easy to see who has what.  All you have do is peel off the protective plastic which is a minor irritant and with the white ones I used watered down grey acrylic paint and dragged the brush across the etched writing before wiping off the excess - just to emphasise the writing, it took all of 2 minutes.


Bikou wishes she had shot Hotaru with her shuriken instead....

That's it for this week folks
Hope you enjoy
dGG


Wednesday, 13 July 2016

I am the one, the only one.......Just gimme the prize!

hi all

Ok so I may have just fudged a rather excellent Queen song for the sake of a blog title but hey ho....

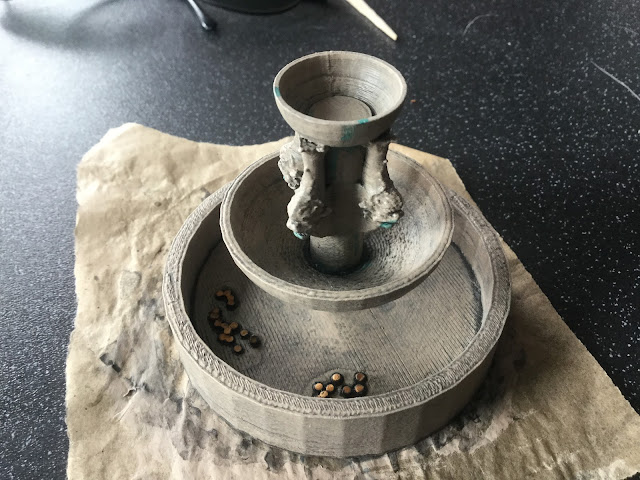
Anyway, at the beginning of the month the esteemed Lord Siwoc of Brain and Guts fame ran a giveaway which I was lucky enough to win (ok there was a 33% chance). The prize was a rather cool 3D printed fountain from HORIZONCREATION3D.


Well I received said prize and a little bonus from milord (Danish sweets - yum!) in the post last Friday and by Sunday it was finished! I was that happy with it literally I couldn't wait, if work and my daughter's birthday hadn't been in between it would have been done even sooner.... 

pre-primed, glued with Gorilla glue

There was some minor clean up from the 3D printing to do, loose wire and some sanding otherwise it was easy to prepare and took paint really well. A spray black primer to start followed by two coats of "cookie dough" emulsion - same as the stonework for my Bushido temple. Then I chopped up a High Elf spear shaft to produce some coins and Pva glued them to the bottom of the fountain to represent a wishing well type thing (!?) a quick coat of GW "shining gold" and then the whole thing was washed in my homemade black wash and base highlighted. A quick spray of Matt laquer and we get to


Then it's a toss up between leaving it there or adding water. After a lengthy internal debate I added the two part epoxy I used on my newest Bushido board, I only needed two tubes (although I probably could have got away with one) so it cost £2 for the whole model to look like this


Apologies for the slightly yellow cast, the epoxy does look like this before drying completely clear but I couldn't wait to take pics.....


An hour later it looks like this.  The epoxy is hard to the touch although still a bit tacky.  It was at this point i thought about using some microfilaments from a xmas decoration to in a sort of spray at the top of the fountain that the epoxy could have adhered to to make it look even better.....never mind, maybe next time.

Anyway my thanks to Lord Siwoc for the fountain it's amazing and will fit in just about every setting I can think of. Check out the Horizoncreation3d site (the link is at the beginning of the post) there is loads of great stuff on there, I particularly love the bioterrain! :-)

Hope you enjoy
dGG

Ps - sadly no sweets survived past the weekend, this blog post is dedicated to those Danish "rock candies" that sacrificed themselves for this sad, fat Englishman's pleasure...


Monday, 11 July 2016

Jung Pirates board completed

Hi all,

I've pretty much finished my pirates board, the last things I needed to do was I guess the scariest in that they had the most potential to go wrong and that was the flocking and the most scary of all the water!

I tackled the water first thinking that if I buggered it up I wouldn't waste all my flock. To that end I had to think how I was going to achieve the right effect. I had already looked up how to paint the estuary bed, which you can see in my last post here, so now needed to cover it some how. I already had a little Woodlands Scenic water from my WW2 canal board, but it was only about half a bottle and that would only provide a thin layer, certainly not enough for a proper effect - still chucked it on though....

But should I go get more at £17 a pop or try to find a credible cheaper option? Rolling up my sleeves I mustered up my best web-fu (which isn't that impressive), however I did hit the jackpot with Luke's Affordable Painting Service - remember him from my last board posting? He not only helped me save money on my ink washes for the board by showing me how to make my own for less than a pound (half a jam jar of black wash and I only used about 20p worth of rinse aid and four drops of black paint...) but he showcased a cheap two part epoxy resin that is great for water effects.  this is the link to his FB page here and his Youtube for this effect here


Each pack comes from Poundland and yes it costs just £1 however I needed 13 packs to cover my board, still it's £4 cheaper and to be fair the stuff dries in 10 minutes and completely hardens in 16 hours regardless of how thick the pour, meaning my drying time is significantly reduced by several days (each scenics layer takes over 24 hours to dry and I would need about 4!) the only down side is you have to work fast if like me you mix lots of it at the same time. I recommend using one pack at a time if you want to get a smooth pour, however you could end up with little steps or gaps all over where the seams between pours are.  For me I didn't want smooth as my water was tidal, this epoxy was just perfect for creating waves and eddies. The only criticism of the epoxy is that it is still a bit tacky even a few days later so i might have to sort this later with a thin layer of PVA.

a good look at the way the epoxy is waved


the water beds

After the resin/epoxy pour it was time to build the bridge that joins the two markets and add the wooden jetties that I had prepared earlier, bringing us to this...


That just left the flocking, for the that I needed quite a bit and I was worried that I didn't have enough of my Army Painter Steppes Static Grass, which I usually use. I also wanted to lighten a rather brown board up so I mixed the static grass with a dark green flock from Woodland Scenics which I've had for ages but never used as it's too bright on its own. And I ended up with this.....


and after I've added all the details i've been working on.

coiled rope objectives (made out of wool)

Lady Oka and bodyguard sample the delights at Cupid Burgers

the flea market

a water kami playing in the harbour

water Yokai cavort in the estuary


Kintaru fishes off the banks


arial view
Richard Fairbrass's original board which inspired the layout and was given da Gobbo twist!
My thanks go to Richard Fairbrass, whose layout on his own board helped me incorporate the scenario objectives into my own.  Thanks to Luke's Affordable Paint Service for saving me a boatload (groan) of dosh, I wish i'd found your page before I inked my Temple board, which would have saved me a ton of cash! And big thanks to Joe from Zabadak's ZombieWorld for the inspiration in the first place, as soon as I saw those awesome pirate ships of his I wanted to do a board, i just lacked the ambition to make a big ship for the board (which was the original idea), sorry Joe but baby steps - next time though....

I shall just leave you with a quick video showing the board in more detail. This time I've narrated a little bit to accompany the video, I can only apologise for the sound of my voice which is a little rough - no I'm not ill, I really do sound this bad normally! Be thankful the original video was 4 minutes but Blogger could not update such a big amount of data and it took days to upload and then didn't work! so this is the abridged version.


Hope you enjoy
dGG


Friday, 8 July 2016

Jung Pirates board - WIP

Hi all 

So work is progressing on the board, mostly painting.  After sealing the board with several layers of watered down pva I sprayed the entire board with 2 layers of a red primer spray. I chose red only because it was cheap from "The Range" and close enough to the brownish look I was going for.  This is what it looked like, I must admit it looks like a Mars landscape and I was tempted to leave it and just have it for a John Carter scifi type game!

However I persevered and used another cheap spray from "The Range" this time a Rover Russet Brown colour, unfortunately I didn't realise the glossyness of the spray (I should have of course!). Having sprayed this layer down I needed to tone it down a bit, but it would have cost me a fortune in black washes such as GWs "Nuln Oil".  This is where the power of the internet comes into it's own...well i'm sure there are other uses but..... with a little web-fu i managed to find this guy Luke's Affordable Painting Service. On his FB page he has a link to a YouTube tutorial which you can find here among loads of other really cool ideas which will feature, including the water effect I'll use later on with the board. I can't praise this guy enough, the wash that I made for this board cost me less than £1, compared to the hideous amount of money that the several pots of "Nuln Oil" would have cost, don't get me wrong I will more than likely keep using 'proper' paint for my minis (at least until I'm totally comfortable with it) but for my terrain pieces this tutorial is spot on!!


now it's still very shiny here, the wash toned it down a bit, but the gloss is shining through but I wasn't worried as it was my intention to put on multiple layers of paint over the top as I highlighted up.  Using GW's "Mournfang Brown" as a base i added an increasingly larger amount of Dulux "Cookie Dough" (the colour I use for my Temple terrain) to apply 3 or 4 layers of highlight to get it to....


The next task was to glue the pilings for the jetties to the base and paint in the river/sea beds and for this task i went back to Google as I've never been happy with the way my water effects have come out.  Stumbling finally across an amazing model railroad blog that broke it down brilliantly, you can read it here. Using the guidance I found there, I came up with a colour chart for me to use when preparing the paints so that I could easily reproduce it and then applied it to the appropriate areas.


and then I added the wooden floors for the market places and finally we have.


which is where I'm going to leave it for this post.  Next time the finished article!

hope you enjoy
dGG


Wednesday, 6 July 2016

The market place and a new arrival

Hi all

I've started crafting the detail for my Jung Pirates themed board, so it was time to start the markets.

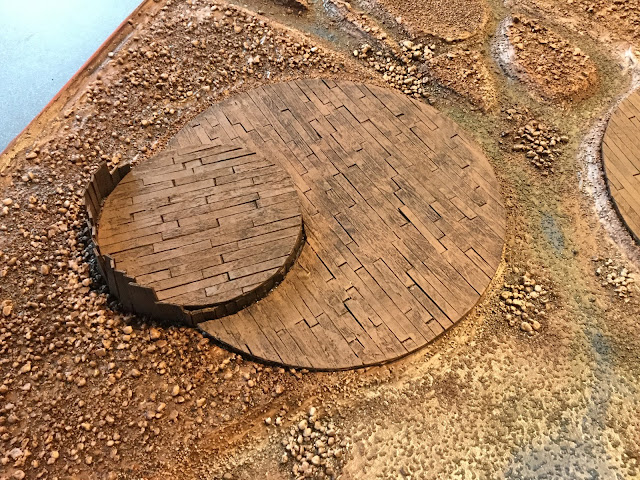
Starting from the floor up then, both areas of control, needed to be well defined for the scenarios and to clearly mark the boundaries. First of all I thought about a low wall but this seemed a bit counter-intuitive as I wanted to represent an open market, with traders hawking goods to all. Instead I defined the boundary simply by planking the floor.

Now I could have stuck the planks directly to the floor but I think it would have been a nightmare trying to shape them properly as I wanted to keep the circular area rather than squaring it off. So I cut the shape of the lower area and raised platform out of cardboard from a cereal box and glued the planks to that, then I left them under some heavy books for 24 hours to dry before trimming off the excess with clippers and then sanding down the edges to produce...


the lower area is the 8" control zones of which you need two for one of the scenarios - "Ichi no Riten". These will be the markets themselves, both the flea and the flesh markets. The two raised platforms are 4" control zones and will be for the overseers of the market place. There are 3 such zones needed for the scenario - "Ryodo" and a single central zone for - "Botoku".  The central zone for each of these will be represented by a wide bridge (about 3.5") that joins the two sides of the river and the two markets.  The bridge will be built later but will be permanently attached to the board.


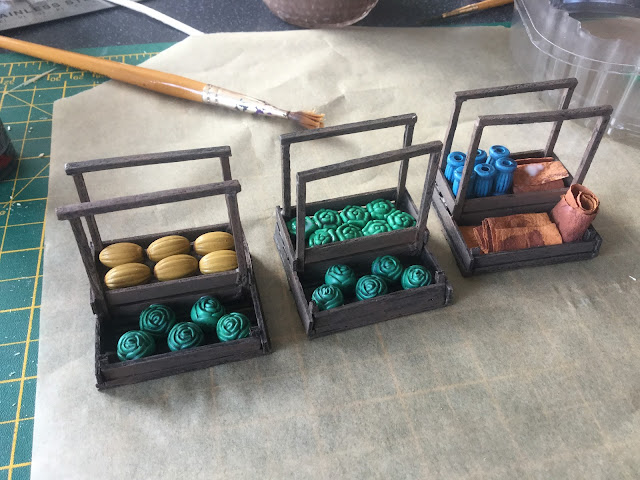
Now that I've defined the boundaries, the next step is the detail. For the market itself I needed stalls of colourful goods - plunder taken from ships across the Isles by the Jung pirates.  As regular readers of this blog know by now, I like making my terrain from scratch, mostly because it's fun but also because it's frugal! Time to break out yet more coffee stirrers and matchsticks to come up with these...


As to the fruit, I recently purchased some beads from "the Works" a discount store here in the UK. Some of the beads have gone on to be vases on a couple of my Prefecture of Ryu minis, but there were just some of them organic looking enough to become fruit and veg. With a little bit of paint I was able to do this....

the beads for the fruit
and painted


the finished article with canopies
The vases were beads from the same pack as the fruit and the cloth was simply painted kitchen towel.  All in all very pleased with the effects so far.

Next up was the detail for the high table, the platform that overlooks the general market.  For this i decided to do a money lenders stall (although the moneylender himself has fled due to the trouble that's coming his way, in fact he fled in such a hurry he forgot his money....

coffee stirrer table and chair, miliput money bags


miliput and matchstick scale and chopped spearshaft coins

painted up


with the creditors list in kanji
so far so good, so onto the flesh market.  This sounds kind of sordid and I was a bit worried putting in a market for the purposes of selling human beings, a practice that I find abhorent in every single way. But it was a staple of most cultures that people were sold into servitude whether for entertainment purposes - gladitorial type fighting pits/arenas or to fill brothels or to fulfill menial positions in wealthy  households.  I was tempted to hit Hasslefree's site and pick up some Harem girls and guy for the slaves but thought this just a step too far and came back from the brink of madness and went for empty pens etc.  The next thought was how to represent the market and my brain went back and forth over the problem. First of all i was going to do simple wooden post fencing, but the board was already going to be really brown from the river and earthy tones of the ground work and wooden planks. Then I hit upon doing screens, the wealthy would not want to be offended by the sight of the multitudes and would want discretion when choosing their 'stock' so i went back to the matchsticks and with a bit of cereal box card, slapped on a bit of paint and came up with these...

in the background you can see one of the wooden jetties for the board
they are individually based so that I can put them in various different setups like


so not as complicated as the flea market but i think it breaks up the space nicely and provides some colour to a board that suffers from a lack of it. As to the higher platform, I wanted initially to do a kind of row of chairs for the wealthy buyers but quickly got bored after making one chair (which I used for the moneylender instead) plus again I think it would be less colourful.  Instead I went with an executioners block for the slaves to be kept in line - a bit dark I know and I do apologise but I thought it apt.


The stone was made out of foamboard with the paper sliced carefully off and roughed up a bit, I then sanded a groove in the middle where the necks of the unfortunates could be exposed.  the axe was made up from a High Elf sprue for Phoenix Guard and converted to remove the elvish bits (ribbons and such).  The chain was from a broken necklace courtesy of Mrs Gobbo. It's a little grim but effective.

Last but certainly not least, I have a new addition to da Grotto courtesy of the wonderfully wacky "Sensei" Jez from Carrion Crow.  Following what might have been a throw away comment from Jez on another of my posts which you can read here, Jez offered to build me the Jwar Island franchise of "Cupid Burgers" a chain of fast food providers scattered across the multiverse. All I had to do was provide the proprietor, I of course took him up on the generous offer (read "bullied him into") and received a rather well padded package recently in da Grotto...


Master Crow has definitely done me proud with such an excellent piece, loads of little details and put together so well and painted brilliantly.  As for the chef, I haven't got a name for the fellow yet but I'm sure something will present itself later on but for now he is ready to find a place amongst the market stalls ala CMOT Dibbler.  I painted him up in corporate colours and he is busy preparing what may have been modelled as a squid but I've painted it up to look like prime 'organ meat'.

Cupid Burgers - the beating heart of the community!

that's it for now, hope you enjoy
dGG