Wednesday, 25 May 2016

SAGA terrain and other bits

Hi all

as you are well aware (unless of course you are new to the blog, if so where have you been? we've been having a ball....) myself and my three fellow gamers from the "Nerd Herd" are recreating the classic White Dwarf article the "Tale of 4 Gamers" but using the Gripping Beast classic - SAGA instead of WFB.  The series of blog posts are covering our thoughts and painting efforts in order to get our chosen factions to the table and will be covering how they do in the early games too.  But one thing we haven't discussed and that's terrain.....
As regular readers know I do love putting together some terrain and SAGA has got my creative juices flowing.  So first thing on the agenda was a hall for my Warlord "Waelwulf the Fierce" to hang his mighty Dane Axe in.  I started looking for source material on t'internet and found a treasure trove of images of replica dark age buildings to choose from.  Dark age building materials included wood or wattle/daub walls and mostly thatched roofs, although some were plainly wood-planked, there was very little dressed stone or tiling and those buildings that had them were normally looted from old Roman tenements.  Here's what we have.
it starts with foam-board and the awesome, legendary even coffee stirrers as a frame.

I decided to go with half wattle/daub and half wooden plank walls

simple earth flooring, I will be adding rushes/hay cots in afterward

the roof frame

the thatch was from an old dog toy that I cut into lengths and piled on
The finished exterior

interior shot with some straw flooring

the Garlinge Fyrd protects the hall
I still have to model some bits for the interior, a fire pit and a dias with chair/throne, weapons racks and shields for the walls etc.  But the model is on the board now and available for our first few games.

 I also made a few hay-ricks as scatter and will probably follow this up at a later date with a hayfield and cart (the cart is in progress but it is languishing on the modelling table without wheels.)


On the Bushido front (yes I bet you thought the Bushido was drawing to a close.....nah!) I've also been looking at little bits and pieces that will make life a little easier when playing the game etc, hence the recent dice tray post.  I wanted somewhere to store my profile cards to protect them and prevent me from misplacing (losing) them...

To this end I used my origami skills (I am at least a 1st dan Origami practitioner) and made up a simple box.  I then painted it the same colour as the tiles on my Bushido buildings and the sides of my Temple board - Johnsons "Red Spice" emulsion and added some painted detail to the sides. In order to organise and catorgorise the cards into factions I added some dividers.  Here's what I came up with.

some cereal cardboard - sprayed black, drink stirrers, the inlays of the blister packs for Temple, Prefecture and multi faction minis

i painted the faction logos onto the stirrer heads

using gaffer tape fixed the stirrer onto the unpainted side of the card and then glued the sides together

added the inlays for detail

and the reverse sides

finished box

with side detail
In the background of the last photo you can also see a tube of cheap poker chips, I'm going to use these as tired, exhausted and ki tokens.  I have simply painted some kanji on the middle of each chip. The tired/exhausted are reversible and the ki are just on one side.  There are token sets out there but they cost £22 per set, this tube cost me £1 and a bit of time. I still need tokens for poison, fire, control and all that stuff but for now this will suffice.

hope you enjoy
dGG


Monday, 23 May 2016

Multi-faction fighters

hi all  (apologies for the longish post)

In Bushido like all other Wargames, miniatures fall into certain factions. As gamers we choose a faction based on the look of the models, the style of play and/or the history and mysticism that surrounds it.  For Bushido I love the idea of high kicking, mystic monks fighting for balance and harmony AND samurai and high Japanese society, hence my choice of factions - Temple of Ro-Kan and Prefecture of Ryu. I also love ninjas so I guess at some point I'll be looking at Kage Kaze at some point in the future (probably the end of this year), oh and pirates so Jung as well.....ooh demons and zombies - Savage Wave and Yurei.....erm 

But there are some models that cross the faction lines and can actually fight for several different factions (the rascals!) although by doing so their rules change ever so slightly.  I like this as it allows the gamer to dip their toe into another faction and see how it plays, it offers a player different options and tactics not normally associated with their chosen faction and it presents different painting challenges for those who like that part of the hobby (there's only so many orange robes a guy can paint ya know!)

For me I went out and splashed the cash at Salute on these guys...

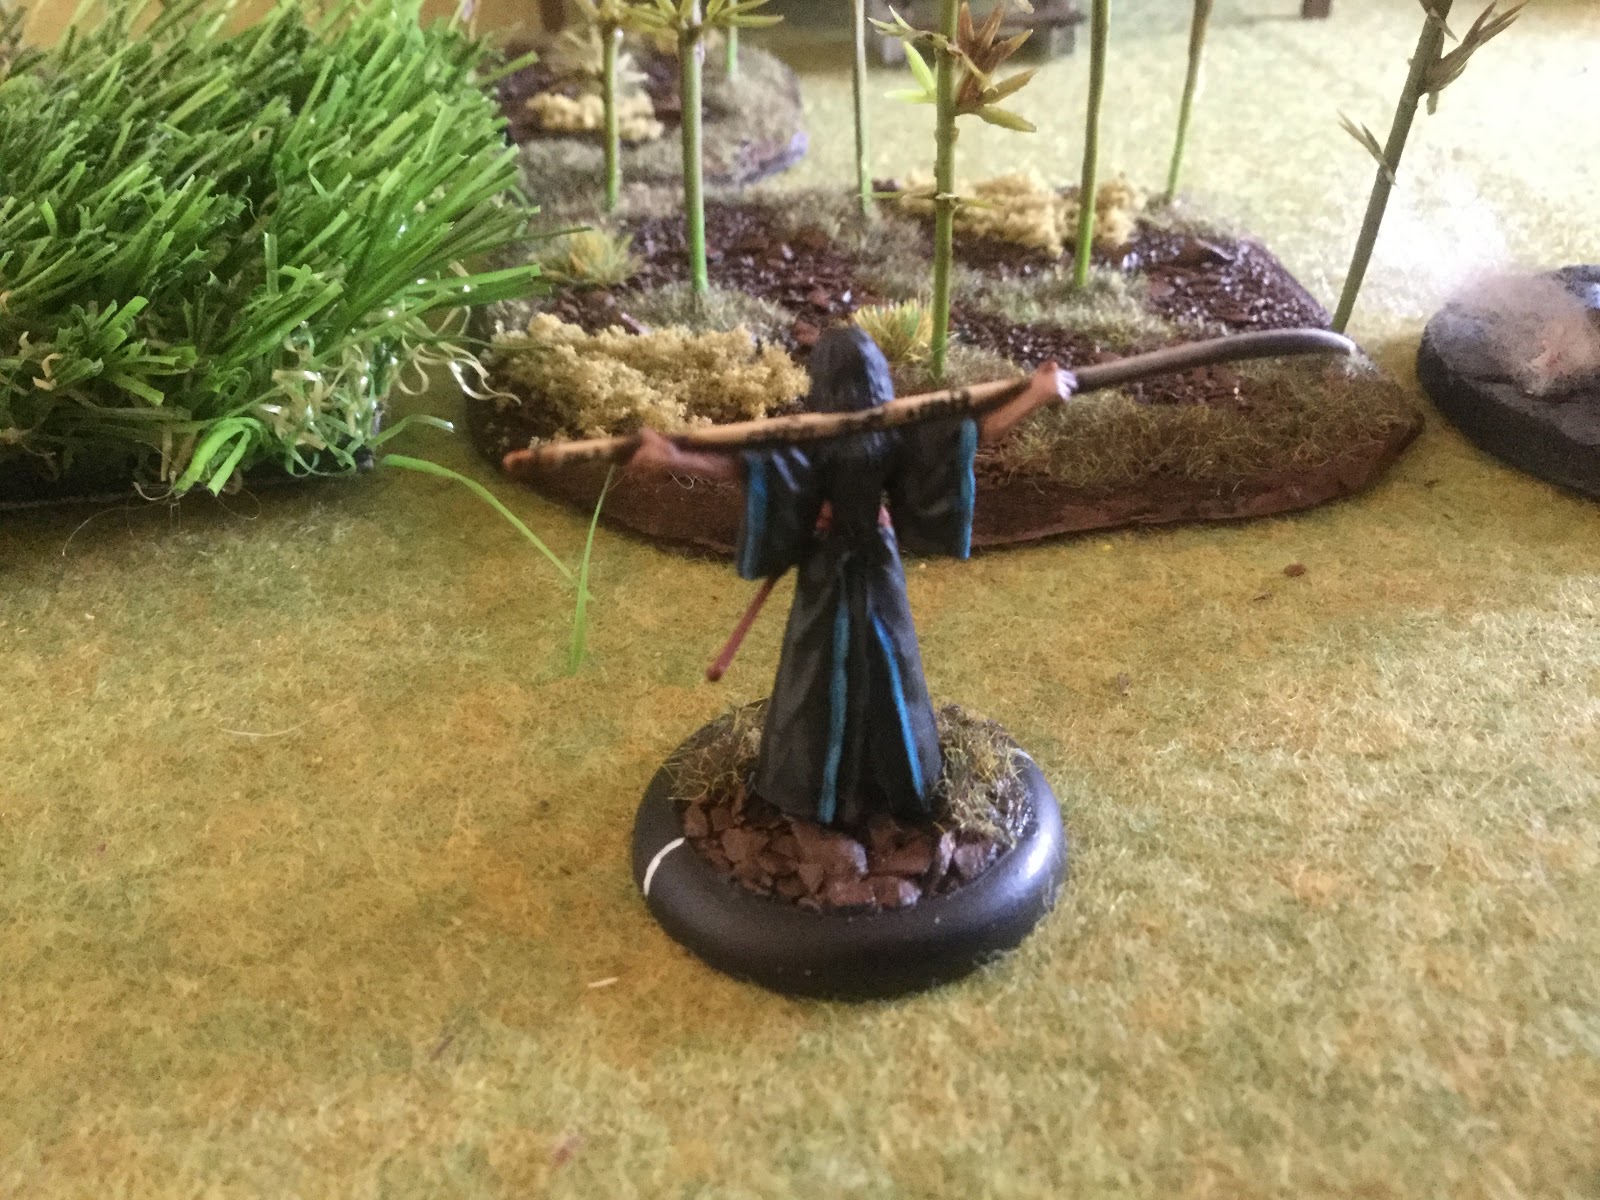
First up we have "The Grey Pilgrim" there is no blurb for her from the GCT studios so my thoughts are that she is a messenger of Raijin - the God of Thunder, with her lightning bolt ranged attack and "electrify" Ki feat. She is classed as a "Seshin no goei" who were a group of highly skilled warrior women and her stat line and traits reflect that.  Pilgrim can fight for either my Temple faction or my Prefecture faction so was a total must have.


Next we have "Bikou", She was a special character bought at Salute and produced for the show. She is my first ninja and looks bloody awesome!! Armed with her Kasari she trips and slows her opponents while striking from the shadows. There are two versions of her and as I said I have the 2016 version which is great, I might at some point find the other version too as I like it so much.  This is her blurb from the Prefecture faction entry.

 Bikou is a highly trained ninja. Skilled in the arts of stealth and distraction she strives to strike where her enemies least expect her.

but over Salute, GCT revealed Bikou to be a double agent see the revised blurb.

Her true affiliation is now revealed, an agent of the Kage Kaze Zoku right in the heart of the Prefecture, her true mission unclear, but it only goes to show the ninja can infiltrate anywhere. A ghost and skilled assassin, almost impossible to pin down in melee she is as elusive as the morning fog, as deadly as the Takifugi, her enemies can never know when or where she will strike. The danger only increased further as part of a Shadow Wind death squad.

so there we have it Bikou can be played as part of the Prefecture and as Kage Kaze operative which will probably be my next faction.


Next up is "the Golden Sentinel".  This guy just looks the business, tough and competent - which he most certainly is.  He will act as bodyguard to some of my weaker but important characters that influence the game without getting into combat, acting as their sword and shield. He is very useful as he can fight for Temple, Prefecture as well as Ito which I don't have or plan to have...... just yet :-)

The Golden Sentinels are the bodyguards of the Emperor’s clan, guarding the family on their travels, in their homes and in court. They also serve as escorts to his Teishin as they journey his Empire spreading his holy word. If the Teishin of the Imperial court are the Emperors voice in distant more barbaric lands, then the Golden Sentinels serve as his shield, all proven warriors, sworn to protect their charges with their lives if needed.


Lastly we have "the Kappa"  Again GCT haven't put out any blurb regarding this fellow but he looks to be based on the Japanese Yokai bearing the same name.  Kappa translates as "River Child" and is a Suijin or water deity. In folklore there are several conflicting ideas about the level of malevolence that the Kappa possess, ranging from the trickster to rapist and murderer.  Because of this GCT have opened Kappa up and he is available to all factions in the game and therefore ideal for me! There are more than eighty other names associated with the Kappa  in different regions, including kawappagawappakōgomizushimizuchi, enkōkawasosuitengu and dangame. Along with the oni and the tengu, the kappa is among the best-known yōkai in Japan. Important to note is that the name "kappa" is not the official name for the creature or even the most commonly used name so much as its the name most well known outside of Japan.


All of the above I painted more or less in line with how the Studio had them depicted (although not to that standard obviously) with only a few little deviations to tie them into my factions, hence the Grey Pilgrim has an orange sash as well as a blue stripe to her robe, also encouraged by some of the messages I received regarding kanji on Genji's yari, i replicated it on hers albeit with the kanji for lightning!  Bikou was a fairly neutral black combo as befits a ninja, there was an issue with a missing part - the ribbon sash flowing at the back of the miniature but a quick email to GCT and with some excellent customer service, quickly dispatched it out to me.  With the Golden Sentinel and Kappa I left the deviations out as they had to cover the most factions....

Another little side project that I've been working on is a safe place to roll some dice, i've been getting fed up with losing dice off the table, cocked dice and all the other misfortunes you can have and after seeing Bryan's (of Vampifan fame) excellent Goki Wooden dice plate earlier on this year, which you can see here, i decided to do something about it.  The project got sidelined with other priorities coming to the fore including my obsession with Bushido, but with another uni deadline coming up my procrastination skills rose to the fore and the dice plate became a distraction....

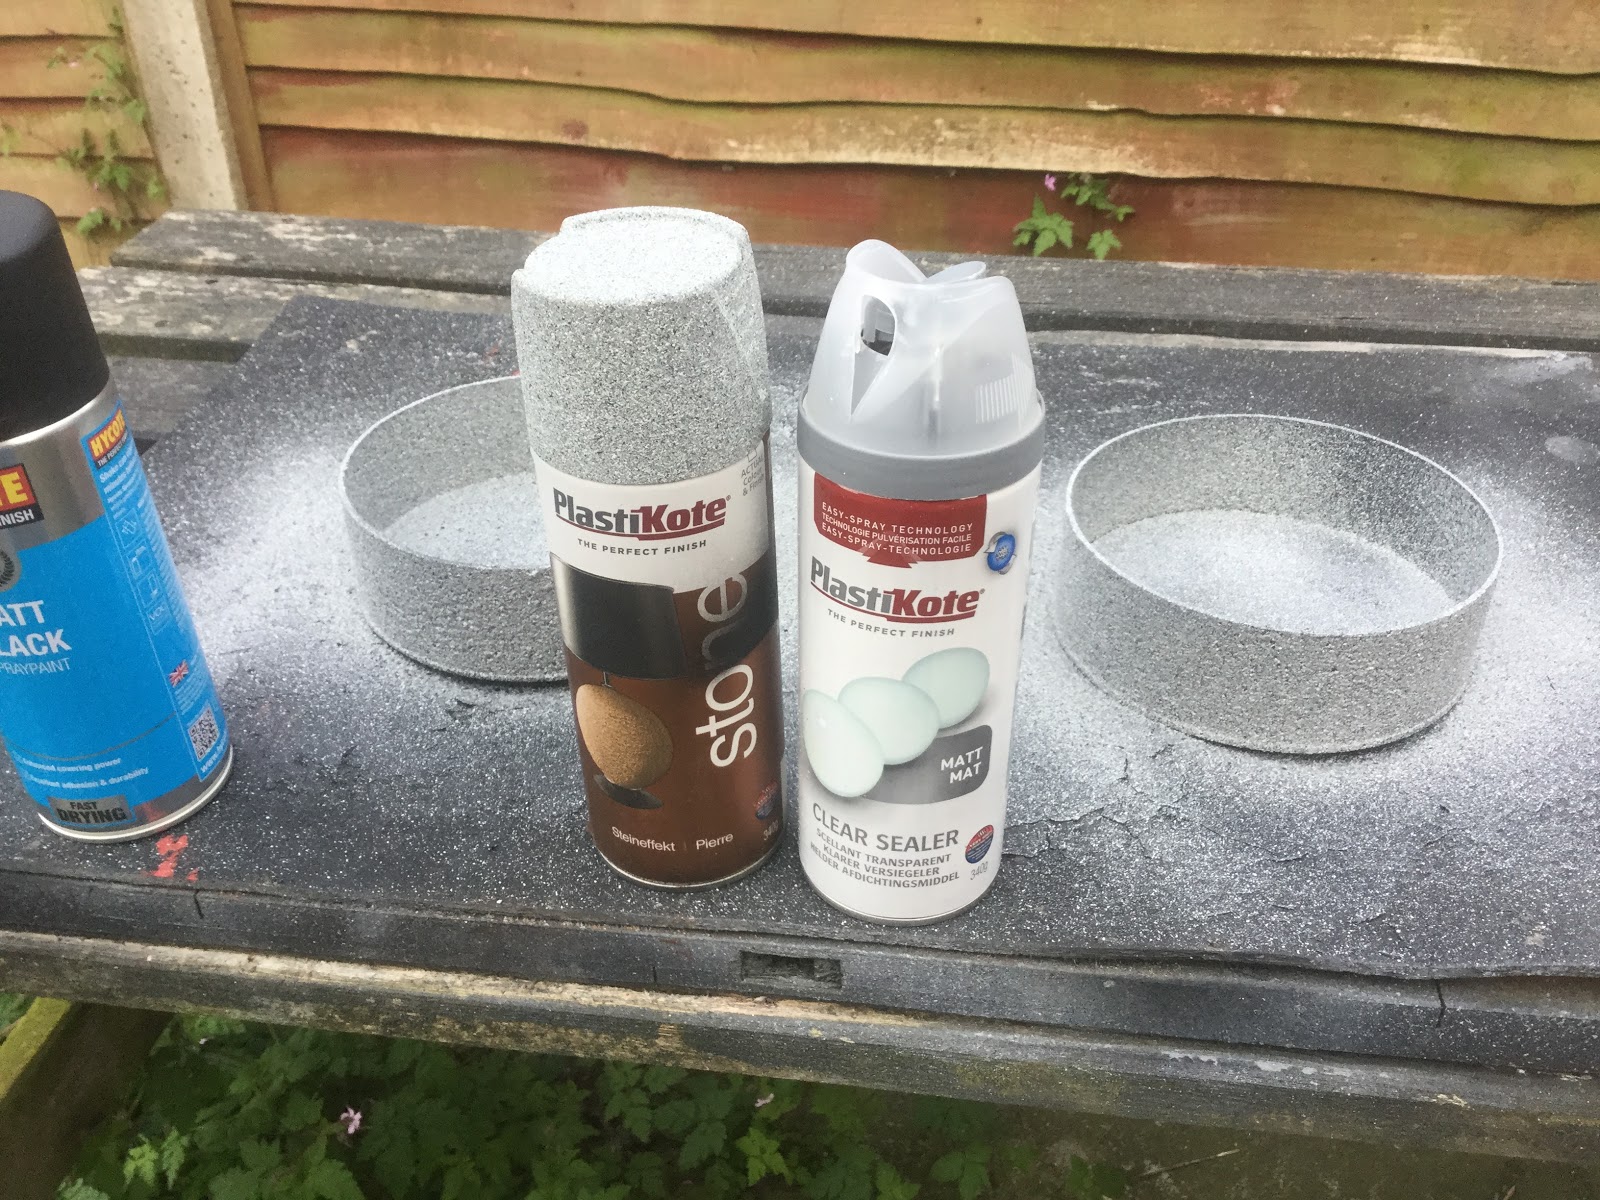
So with that in mind I cast about for a suitable vessel when I found the perfect thing.  A large (empty) coffee container i found lurking in my loft that I had chucked up there thinking one day it might come in useful (i don't even drink coffee, i think i'm part womble....lol). Now in Bushido both opponents roll dice at the same time, so as the container is so big, i thought why not do two!


I used gaffer tape to mark a straight edge around the circumference at the top and the bottom of the container and to provide an extra level of strength to the cardboard body.


Obviously one end had a bottom already but for the other I had to cut a bottom out of a piece of cereal box. Which I then gaffer taped in place using the lip of the top of the container to hold the card in place.  I also cut a circle of my favourite foam which is nice and soft and will absorb some of the energy of the rolling dice and prevent them from bouncing out ready to line the bottom of the trays.


Ok, so I can't just leave it all rough and ready like that, although it will certainly do the job I do prefer to have things a little neater.


Using a stone effect spray I had over from a different project, I gave the trays a coat inside and out and sealed it with a sealing spray I had over from my Temple project.


So we have the tray, I could just add the foam to line the bottom and it being black it would look neat and tidy but i took it a step further...


and added a grass mat that I've had lying around for years and have been chopping up for various projects including my terrain boards for ATZ and Bolt Action.  This looks aesthetically pleasing and has the added benefit of adding that extra energy absorbing power!


The finished pair...


and with my Bushido dice in play. So there we have it a pair of dice trays ready for my first games. Thats all for now....

hope you enjoy
dGG

61:56 (-5)


figs bought:painted (difference)


Friday, 20 May 2016

The Temple

hi all

In a previous post I showed you a teaser pic or two regarding a Temple board for my Bushido factions to fight over.  You can see the post here

So let me show you how I got on. The board itself was inspired by the demo board I played on at Salute.

Firstly I gathered the bits and pieces required, now this board is going to be relatively simple and unlike many of my other projects the details will be mostly removable so that I can vary the scenarios played out on it.

1. 2'x2' board, I went with an artists canvas. Sounds strange as the canvas gives but it has a wooden frame and a centre batten for strength and I'm going to cover it with....
2. Polystyrene ceiling tiles as close to 2' as you can get them mine were 50cmx50cm - I used 5
3. PVA glue
4. large sheets of foam (my fave!)
5. brown emulsion tester pot (Dulex cookie dough)
6. kitty litter

lets get building!

next up I mapped out how i wanted my board to look, I wanted a central area with a space to add my koi pond or other objective, with tiered areas like an ampithetre but levels rather than steps. I also wanted tunnel like entry points into the temple and this is what I came up with.

luckily I had drunk the tea first and this was drying overnight!

So first of all I glued tiles onto the canvas, completely covering the surface to give the board some stiffness, but keeping the board light for easier storage. Cutting the remainder of the tiles used into "L" shaped tiers, I stacked them to create the tiers, weighting it down with my entire collection of mugs....I then left it to dry overnight.

Next I drew and then scored a tile pattern onto the sheets of foam including a decorative pattern for the mid point of the temple and covered the entire surface area with the foam.  I did this for two reasons, firstly it will provide a level of protection for the polystyrene against knocks and accidental damage as well as stiffening up the canvas.  Secondly I could add lots of detail without cutting hundreds of individual tiles like I did with my hospital project (which you can see here)  I also added foam to the edges of the board just to tidy the ragged sides up.  I then added some kitty litter to cover some gaps and as rubble/detritus.  It can get a little fiddly but it is worth being accurate as you will get some tiles looking bent if the foam is not flat (I experienced this so you don't have too...)

note the centre detail matches the bottom of "the Koi Pond"

the build finished!! took its time.
next job was to cover the entire model in brown emulsion, in the end I put down 5 coats of watered down emulsion in order to keep the detail of the tiling.  I then used the "Red Spice" emulsion I bought for my dojo roof to paint the sides of the board. I used emulsion as it's cheaper with a better coverage, £1.49 per pot for quite a bit of paint compared to a tiny pot of acrylic paint for £2 plus. The most expensive bit was the brown ink wash that covered the tiles, GW's "Agrax Earthshade" was watered down and added liberally, even with the watering down it used nearly the whole big pot.


although this shaded the board nicely, it looked really messy so i needed to tidy it up with a bit of highlighting. The board is too big to highlight individually so it would need to be dry brushed.  i just used a single highlight with the Cookie Dough emulsion and we have....


much better! so all there is to do is to use a clear paint sealing spray to keep the whole thing safe and then add on some moss and ivy to add some character and finally we have...


So here is my board. Hopefully it will have quite a lot of usage, I've completed a couple of bridges to cross the tunnels that can be removed and moved around the board.  With the objectives and Koi Pond that I've completed recently this should be a versatile board and some scatter terrain such as plants and rails/fencing/walls to finish it off. 


Hopefully I will finish off a few more models to complete the two factions I currently have (with an eye on a couple more in the future...) and one of the next Bushido posts should be an AAR.

hope you enjoy
dGG

Wednesday, 18 May 2016

here comes the girls

Hi all

last time I showed my growing Prefecture of Ryu faction for Bushido we had the twins Geiji and Eiji Takashi, a pair of well matched samurai, complementing each others fighting style.  This time  we have the ladies of the house, starting with rather appropriately - Lady Oka.

Lady Oka is as deadly as she is beautiful. Raised in the luxury of Ryu she is a great power in the court and has learned to use the weapons gifted to her just as expertly as those crafted of polished steel and lacquered wooded in the dojo. A nimble and dexterous warrior she wields the traditional weapon of a lady of the samurai caste, with a natural ease and elegance. She moves across the battlefield with the poise and grace of a dancer, avoiding blows and missiles as if they were not even there. 


Not a great deal to add regarding her paint job.  Prefecture colours and base as per the rest of my faction, however I did add a corner of matting to her base using an old conforming bandage, its a little ragged and didn't translate as well as i'd hoped but it does look better in the flesh as it were.  The only other thing to add is the lack of patterning on the kimono compared to the studio version, again I shied away questioning my painting skills but I'm determined to revisit her after I've finished the rest of the faction and add a floral pattern. **

I see her very much in the role of fast attack, grabbing objectives and fending off attacks until reinforcements arrive or slipping away in the face of overwhelming odds.

Next up is Hagane Takashi

Another daughter of the Takashi clan has taken up the fight. Hagane wields her twin Katanas to devastating effect. More like her uncle Hida than his own son, Hiro. Her ruthless streak has endeared her to those that tread the halls of power at the very top of the Prefecture. Hagane can be relied upon to get the job done.


Hagane is a scion of the Prefecture and therefore needed to be dressed appropriately, i based her colour scheme on an icon of Ryu - Mizuchi.  Underside is Fenris Steel and armour Lothern Blue with a Iyanden Darksun trim.  Just to break up the colours she gets a dark red scabbard.

Hagane is pure melee and can be used to bolster any attack, backing up Lady Oka or any other objective taker, charging in and taking out threats.

thats all for this post
hope you enjoy
dGG

** I actually went back and painted Oka and here she is...


61:52 (-9)


figs bought:painted (difference)